Angular is a leading front end framework used by most of the developers all over the world nowadays.The modular architecture of angular,angular cli,typescript support,new routing mechanism and many others made angular so famous among developers.I will explore most of cool features offered by angular throughout this article.
Mr John owns a small grocery shop names Mini Super.He wants to keep track of his customers,product details and orders of the shop.
I am going to explain step by step how to create a simple angular 5 application using angular cli to fulfilling John’s need.
You can download the source code of the application using this [link](https://github.com/isurumahesh/MiniSuper/tree/master/MiniSuperUI).
Following areas will be covered throughout this tutorial
1. How to setup environment for angular application
Angular-cli comes as a node package.First we have to install node.I’m using node 6.9.5 version.You can check the version by typing node -v in command prompt.node can be download using this link. **Node.js** Node.js® is a JavaScript runtime built on Chrome’s V8 JavaScript engine. Node.js uses an event-driven, non-blocking I/O…nodejs.org
angular cli can be installed using “*npm install -g @angular/cli”. *angular-cli documentation expains cool features offering by angular cli.You can go to angular-cli documentation using this link **angular/angular-cli** angular-cli - CLI tool for Angulargithub.com
You can check the version of angular-cli using ng-v command in command prompt.Angular cli version 1.6.4 is used for this tutorial.

V**isual studio code **is used as development interface.
Now we have setup the development environment to develop John’s grocery.
2. Angular cli features and benefits
When you create a project using angular cli, it gives many features like unit testing,end to end testing,environment files,package.json file,minification and bundling etc that makes the development process easy.
Angular cli provides cli commands to create modules,components,service pipes
Webpack support of angular cli makes bundling and minification of the application easy.
3. How to create a new project in angular?
We can create a new project using angular cli command ng new projectname.If we use ng new –help command we can see the what are the extra features we can use when we create a project.
 ng new — help
I am going to create a project with *scss *styles and a *routing *file.When we create a project it creates with default style css and it does not create a routing module.We can override this default behavior using options that comes with ng new command.
I use* ng new MiniSuperUI –routing –style=scss* command to create the project.This will gives me scss styling and requested route module.

I have put the first step for developing John’s Mini Super.Angular cli creates few files when creating the project in initial state and it takes some time to install node modules.Now let’s see what are the purpose of these files.
4. Explaining basic features in angular application.

main.ts-This is the entry point of the application.It indicates what is the bootstrap module of the application.In our application app.module will be the bootstrap module.
index.html-Master page of the application
package.json-This file includes information about installed node modules
angular-cli.json-Style files,Script files and environment information goes here
pollyfill.ts-This files enables running angular application in various browsers.
environment-This folder includes two environment files for dev an production
assets-The static files like styles,images,scripts go under this folder
style.scss-This is the main style sheet
app.module.ts-this is the main module of the application.this module shows which component loads initially.
app-routing.module.ts-this is the main routing file of the application.
5. How to identify modules in angular application?
Modules in angular applications can be divided into three main modules
Core Module -Services that should have only one instance should be implemented here and also components that is not shared in the application should be implemented here.
Shared Module-Components,Modules,Pipes that is shared through out the application should be implemented here.
Featured Modules-All business logic can be divides into multiples modules.They are treated as featured modules.
In John’s Mini Super Customer,Order,Products can be implemented as featured modules and I will explain what are the services and components should be implemented inside core and shared module in next topics.
6. Create modules and components
First Let’s see what are the basic features in a module class.Angular module is a class marked by the @NgModule decorator.The NgMoulde needs to be imports like below.
import { NgModule } from '@angular/core';
@NgModule takes a metadata object which basically contains following properties.
imports:this is an array of modules required to be used in the application
declarations:this is an array components.The components that related to the module should be registered here.
providers:this is an array of services
exports:this is array of modules that would be used outside of this module.
@NgModule({

imports: [

CommonModule,

FormsModule,

RouterModule.forChild(routes),

ReactiveFormsModule

],

declarations: [CreateCustomerComponent, CustomerDetailsComponent],

providers:[CustomerService],

exports:[]

})

export class CustomerModule { }
You can open integrated terminal in VS Code using CTRL+`.Using cli command ng generate module customer we can create CustomerModule.
Then let’s see what are the basic features of a Component.Component is a class marked by* @Component decorator.*@Component decorator accepts metadata object which basically contains following properties.
selector: A CSS selector that tells Angular to create and insert an instance of this component wherever it finds the corresponding tag in template HTML. For example, if an app’s HTML contains
templateUrl:The module relative address of the component’s html template.We can also provide an inline Html template
styleUrls:This is an array that contains the addresses of related stylesheets to the component.
Inside the customer folder CustomerCreateComponent is created using cli command ng generate component customerCreate.When we use cli command to create a component four files are created.They are
.html->all the html elements should be inside this file
.ts->the functionalities that required to maintain the .html should be inside this file
.scss->the styles that unique to .html should be inside this file
.spec.ts->unit tests are written inside this file
Likewise create the Product and Order modules with related components.Remember to register the components in relevant module.
After creating above modules we have a project structure like below.
 module structure
7. Routing
The angular routing enables the user to navigate from one page to another.It is better to keep separate module for routing.You can create a separate module for routing when creating a module with this command ng generate module customer –routing.Remeber to register routing module in related module
-
Add *<base href=”/”> *tag in index.html as first child in <head> tag.It shows router to where the root of the application.
-
Import RouterModule and Routes for your routing module
-
import { Routes, RouterModule } from ‘@angular/router’;
-
Create appRoutes array and pass it to RouterModule.forRoot() method.
const appRoutes: Routes = [ { path: ‘’, redirectTo: ‘/customer’, pathMatch: ‘full’, }, { path: ‘customer’, component: CustomerDetailsComponent, }, { path: ‘createCustomer’, component: CreateCustomerComponent, }, { path: ‘updateCustomer/:id’, component: CreateCustomerComponent }, ];
@NgModule({ imports: [RouterModule.forRoot(appRoutes)], exports: [RouterModule] }) export class AppRoutingModule { }
import *AppRoutingModule *and *CustomerModule *to imports array in AppModule
When user enters [http://localhost:4200/customer](http://localhost:4200/customer) in the browser it should display the CustomerDetailsComponent
The *path *property describes the URL this route will handle.
The *component *property is the name of the component we want to display when the URL in the browser matches this path.
The default route is configured with empty url.The component related to default route is loaded when application starts.
The redirectTo *property describes the path we want to redirect if user enters default route.We also added *pathMatch:’full’ property to make sure only the default route is redirected.
The* :id in fourth route is a route parameter.CreateCustomerComponent is used this parameter to find the customer related to this id.sample url looks like *customer/1.The route parameter is 1 to given url.
After configuring routes there should be place to load the realated components when user navigates.
routerLink directive is used in side navbar to allow user to navigate between pages with clicking the perticular link.
<a [routerLink]=”[‘/customer’]”><span>Customers</span></a>
Now let’s see how to move routing inside modules and enable eager and lazy loading for better performance.
Eager loading:In eager loading all the feature modules are bundled together and loads with application start.This is good for small size applications but when application grows there will be a performance hit when trying to load all modules together.In above customer module is loaded in eager way.To Eager Loading ,the feature modules should be imported to your *AppModule *first.
For better code separation It is better to handle each modules routing inside that module.So we are gonna move customer based routing in AppRoutingModule *to *CustomerRoutingModule
We need to add a
const customRoutes: Routes = [
 {
 path: ‘customer’,
 component: CustomerComponent,
 children: [
 { path: ‘’, component: CustomerDetailsComponent },
 { path: ‘createCustomer’, component: CreateCustomerComponent },
 { path: ‘updateCustomer/:id’, component: CreateCustomerComponent }
 ]
 },
];

[@NgModule](http://twitter.com/NgModule)({
 imports: [RouterModule.forChild(customRoutes)],
 exports: [RouterModule]
})
export class CustomerRoutingModule { }
Mark that routes are passed to RouterModule.forChild() method.Featured Module routes are passed to forChild() and routes defined in Main Module are passed to forRoot() method.
Lazy Loading:Lazy loading is most suitable for large scale apps.We can load featured modules at run time that means when user trying to navigate that particular module that module is provided.
When we use lazy loading that module is not needed to add imports array in AppModule and separate router-outlet file is not needed inside the lazy loaded module.
*ProductModule *is loaded as lazy loading module.We can enable lazy loading for that module like below
export const routes: Routes = [
 {
 path: ‘product’, loadChildren: ‘./modules/product/product.module#ProductModule’,
 },

];
What is the best approach for routing??
We should use eager loading for most used featured module and lazy loading for other modules.The issue with lazy loading, of course, is that when the user navigates to the lazy-loadable section of the application, the router will have to fetch the required modules from the server, which can take time.
To fix this problem we can used *preloadingStrategy *for lazy loaded modules. Now the router can preload lazy-loadable modules in the background while the user is interacting with our application.
RouterModule.forRoot(routes, { preloadingStrategy: PreloadAllModules })
When we build the application,eager loaded modules are bundled together.In below example all the modules are eager loaded.

When we use lazy loading for ProductModule that module is bundled as separate module

8. Reactive forms
Now let’s see how to implement below UI to save customer details.
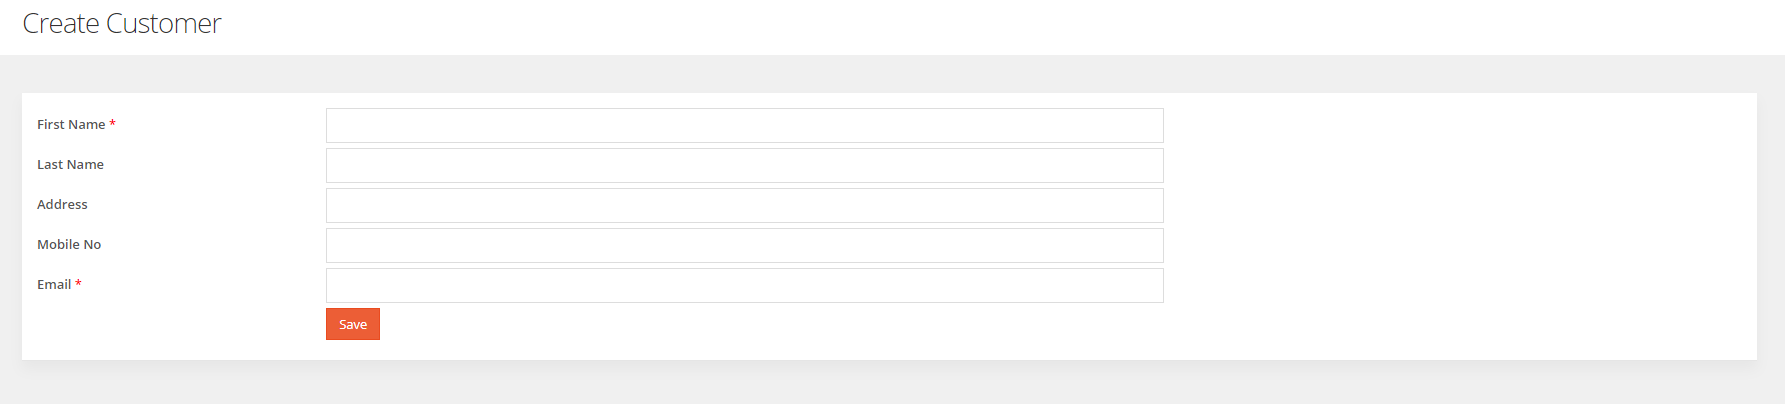 create Customer form
Reactive forms are going to be used to implement create customer form.
-
import ReactiveFormsModule from *@angular/forms *to cutomer module to imports list.
-
import FormGroup and FormBuilder from *@angular/forms *to component class
-
Create a variable type FormGroup
-
Add a private fb parameter of type FormBuilder to the constructor.
Now we can create the customerForm like below with associate FormControls
this.customerForm = this.fb.group({

firstName: "",

lastName: "",

address: "",

mobileNo: "",

email: "",

})
firstName and email are required properties now let’s see how to validate those properties.
import Validators from @angular/form to component class
To make the firstName FormControl required, replace the firstName property in the FormGroup with an array. The first item is the initial value for firstName; the second is the required validator, Validators.required.
firstName: [“”,Validators.required]
if you need multiple validations you can add array of validators as second item
firstName: [“”, [Validators.required, Validators.maxLength(10)]],
Below is the code structure in create-customer.component.ts.
<iframe src=”https://medium.com/media/f2e4ae8c7a3b3b8420bc55b80f37b4d6” frameborder=0></iframe>
We can integrate customer form with html template like below.
<form [formGroup]=”customerForm”>
 <input class=”form-control” type=”text” formControlName=”firstName”/>
 </form>
*formGroup *is a reactive form directive that takes an existing *FormGroup *instance and associates it with an HTML element. In this case, it associates the *FormGroup *you saved as cutomerForm with the <form> element.Use the right *FormGroup *instance name created in the component class
update the template syntax input properties with corresponding FormControls.Use formControlName *to update input fileds with corresponding *FormControls.*formControlName *should be equal to the name that is used to initialise the *FormControl *in component class
<iframe src=”https://medium.com/media/1f6b482d6f1ce11f5854accd73e30257” frameborder=0></iframe>
Now let’s see how to display validation messages.
We can get a reference to form control instances in our template through the controls property of our customerForm.
We use that reference to validate the formControl.Following *formControl *states are useful when doing form validation
dirty: **This **is true if the user has changed the control value
**touched: **This is true if the user has focused on the control and then focused something els
*valid: **This is true when the control doesn’t have any validators or if *all the validators are passing.
errors: This is an object. This will be null when all validators are passed.If there are errors there is one entry for one validator with the validation name.
We show error messages when the input filed value is changed or lost focus
<input class=”form-control” type=”text” formControlName=”firstName” />

<span *ngIf=”(customerForm.controls.firstName.dirty||customerForm.controls.firstName.touched && customerForm.controls.firstName.errors)” class=”req”>

<span *ngIf=”customerForm.controls.firstName.errors && customerForm.controls.firstName.errors.required”>

first name is required

</span>
</span>

<input class=”form-control” type=”text” formControlName=”firstName” />

<span *ngIf=”(customerForm.get(‘firstName’).dirty||customerForm.get(‘firstName’).touched && customerForm.get(‘firstName’).errors)”

class=”req”>

<span *ngIf=”customerForm.get(‘firstName’).errors && customerForm.get(‘firstName’).errors.required”>

first name is required

</span>
</span>
I have shown you two ways how to get reference to control properties.You can use any way as you wish.
9. Http and Services
Why should we use services?
-
Share data between multiple components.
-
Components shouldn’t directly fetch data or save data.It is better to move api calls to a service class.
After creating the customerForm *we have to save customer data.We create *CustomerService *to handle all api calls related to customer module.Inside the folder customer/services create *CustomerService using cli command ng g service customer
import { Injectable } from ‘@angular/core’;

@Injectable()

export class CustomerService {

constructor() { }

}
@Injectable()decorator says *CustomerService *class can has its own injected dependencies and *CustomerService *class is a part of dependency injection system.
After creating the service we should register this service in a particular module.In our scenario we added CustomerService *inside the providers array in *CustomerModule.
Most of front end applications communicate with back end apis over Http protocol.Angular makes easy this communication with HttpClientModule.
In this demo i haven’t using a real backend api instead i have been used Angular in-memory-web-api to emulates CRUD operations over a REST API.
Now Let’s see how to save customer data entered in the customer form to a backend api.Modify the *CustomerService *with following imports
import { HttpClientModule } from ‘@angular/common/http’ to AppModule class
import { HttpClient } from ‘@angular/common/http’ to CustomerService class
Modify the CustomerService constructor with a parameter that declares a private http property
constructor(private http: HttpClient) { }
All HttpClient *methods return an RxJS Observable.Rxjs Observables* are very powerful comparing to Promises *because we have the ability to cancel the http requests using *Observables.
We pass customer object to saveCustomer *method and It returns an observable.We can use Rxjs map* operator to manipulate response and catch operator to error handling.The default response type of the request is JSON.
HttpClient.post() method take three parameters (url,data,options),options is an optional parameter.We use options parameter to set header properties whenever we need
saveCustomer(customer: CustomerModel) {

return this.http.post(`${this.customerUrl}`, customer).catch(this.errorHandler);

}
CRUD operations that have been implemented to customer can be seen below
<iframe src=”https://medium.com/media/04458c2f9e6b0af42ac321255a8028e5” frameborder=0></iframe>
Now let’s see how to call CustomerService *through *CreateCustomerComponent
First create a separate class called CustomerModel *with properties same as *createCustomerForm.Now we can bind createCustomerForm *values to *CustomerModel.
export class CustomerModel {

id: number;

firstName: string;

lastName: string;

address: string;

mobileNo: string;

email: string;

}
Update the CreateCustomerComponent *constructor with private *customerService *parameter type of *CustomerService.
saveCustomer() method in CustomerService *is an observable so we have to *subscribe() this method to execute it.The typical type of subscribe operator take one to three methods,success,error and completed.The completed method calls only if there are no errors.
saveCustomer() {
    this.customer = Object.assign({}, this.customerForm.value)

this.customerService.saveCustomer(this.customer).subscribe(res => { },
      error => { },
      () => { }
    )
  }
Now we can call the* saveCustomer()* method directly from the html template after clicking the save button.
10. Data binding
There are several ways that we can handle data binding in Angular application.
**Interpolation **
When we want to display some value of the component inside the template interpolation can be used.
Eg:Displaying customer first name in the template
Property binding []
We can bind html properties using property binding
Eg:Disable submit button when form state is invalid
<button type=”submit” class=”btn btn-primary” [disabled]=”customerForm.inValid”>Save</button>
Change the background color of a div
<div [style.background-color]=”selectedColor”></div>
Event binding ()
To execute a method in the component when specific DOM event happens
Eg:Execute saveCustomer() method when clicked save button
<button type=”button” class=”btn btn-primary” (click)=”saveCustomer()”>Save</button>
Two-way data binding [(ngModel)]
This syntax is called banana in a box.When we use two way data binding changes in the component reflects in the template and changes in the template reflects in the component.
<input type=”text” [(ngModel)]=”customer.fisrtName”>
After saving customer data we have to display customer details.Create new component CustomerDetailsComponent *using cli command ng generate component customerDetails.Register the *CustomerDetailsComponent *by inserting it to declarations array in *CustomerModule.
 customer details
We are going to discuss now how to implement above view with edit delete functionalities
Inject the CustomerService *to *CustomerDetailsComponent.
Inside the ngOnInit() life cycle hook,call getCustomers() service method and assign the response to customers array.
customers: CustomerModel[] = [];

constructor(private customerService: CustomerService) { }

ngOnInit() {
 this.customerService.getCustomers().subscribe(res => {
 this.customers = res;
 }, error => {

}, () => {

})
 }
Display customer details in html table.
<table class="table table-striped">

<thead>

<tr>

<th>Name</th>

<th>Mobile No</th>

<th>Email</th>

<th></th>

</tr>

</thead>

<tbody>

<tr *ngFor="let customer of customers">

<td> </td>

<td></td>

<td></td>

<td>

<button type="button" (click)="editCustomer(customer.id)" class="btn btn-primary btn-xs">EDIT</button>

<button type="button" (click)="deleteCustomer(customer)" class="btn btn-danger btn-xs">DELETE</button>

</td>
</tr>

</tbody>

</table>
*ngFor structural directive has been used to loop customers array.Interpolation has been used to bind customer values in the table.
-
*ngFor is a structural directive because it can change the shape of the DOM structure.
-
*ngFor directive comes with CommonModule,so CommonModule has been imported to CustomerModule.If we use structural directives in components inside the AppModule,CommonModule is not needed to import because BrowserModule comes with structural directives.
Adding functionality to Edit Customer
When edit button clicks we should navigate to create customer view and *customerForm *should be bind with respective customer details.
add editCustomer *method to *CustomerDetailsComponent.It accepts customerId *and after that navigates to *createCustomer *view.We have defined a separate route for edit customer in *CustomerRoutingModule.It accepets a router parameter “id”.Inject Router service to constructor of ComponenetDetailsComponent and reference it to a private variable.Using the router navigate method we can navigate to *createCustomer *view using below code.
editCustomer(id: number) {
 this.router.navigate(['/customer/editCustomer', id])
}
Bind the editCustomer() to click event in edit button in the CustomerDetails *view using event binding and the pass the *customerId *to *editCustomer()
After navigating to *CreateCustomer *view we can see a url like below
[http://localhost:4200/customer/updateCustomer/1](http://localhost:4200/customer/updateCustomer/1)
We should get the *customerId *form the url now.Inject the *ActivateRoute *service to the constructor of *CreateCustomerComponent *and reference it to a private variable.Using the *ActivateRoute *we can access to route parameter.
this.activatedRoute.params.subscribe((params: Params) => {
 this.customerId = params[‘id’];

 if (this.customerId != undefined) {
  this.getCustomer(this.customerId);
 }
});
After receiving customerId *we should get customer details to given *id *and bind data to *customerForm.
getCustomer(id: number) {
 this.customerService.getCustomer(id).subscribe(res => {
  this.customer = res;
  this.patchCustomerForm(this.customer);
  console.log(res)
 }
 , error => { })
}
Reactive Forms patch method has been used to bind data to customerForm
private patchCustomerForm(customer: CustomerModel) {
 this.customerForm.patchValue({
  firstName: customer.firstName,
  lastName: customer.lastName,
  address: customer.address,
  mobileNo: customer.mobileNo,
  email: customer.email

 })
}
Now we should update the customer with new changes.We call updateCustomer() in *CustomerService *and after a successful update user is navigated to *CustomerDetails *view so user can see the new changes.
updateCustomer() {
 this.customer = Object.assign({}, this.customerForm.value);
 this.customerService.updateCustomer(this.customer).subscribe(res =>
 {
  this.router.navigate([‘/customer’])
 }, error => { })
}
Adding functionality to Delete Customer
When delete button clicks *CustomerDetails *list should be listed without deleted customer.
Add deleteCustomer *method in *CustomerDetailsComponent.It accepts a parameter type customer.
deleteCustomer(customer: CustomerModel) {
 let deleteIndex = this.customers.indexOf(customer);

 this.customerService.deleteCustomer(customer.id).subscribe(res => {
   this.customers.splice(deleteIndex, 1);
  }, error => {

  },
  () => {

 })
}
Using the *deleteCustomer *method in *CustomerService *we delete the respective customer and remove the customer from customers array using array function splice.We don’t use another api call to get the new customers list because performance wise we should reduce unnecessary api calls.
Now we have completed customer related functionalities like wise we can implement *Order *and *Product *related functionalities.
11. Refactoring and Deployment
Refactoring
When the project grows,when more modules added to the project we can see some modules and components are used in many modules .In this app CommonModule,ReactiveFormsModule,FormsModule are used in every featured module.These modules should be added to exports array in *SharedModule *and *SharedModule *should be imported to the modules that is needed above modules.
Deployment
Use ng build –prod command to make a production build.It will create a dist *folder inside the project with bundled files and *index.html.You can copy those files to the server.Using above command we have multiple advantages like It makes Ahead of Time compilation and It automatically takes urls in environment.prod.ts and do the build.
12. What’s next?
I am planning to discuss how to create a real Web Api using ASP.Net Core and integrate with John’s Mini Super